

“Yeah we did…” was a recent Facebook post from a friend of mine.
Those words, in all their lack of specificity, grabbed my attention.
Time stood still as my eyes scrolled down to see the attached picture and my mind was racing with possibilities.
What did Adrienne do?
Did she finally book that trip she has been dreaming about?
Did she and her hubby get matching tattoos?
Did she go ahead and adopt some endangered spider species?
As the picture came into focus here is what I saw before me...a turtle wearing a chef’s hat and various cooking supplies laid out before him.
Written on the picture was, “We bought a new slow cooker.”
For some people that would have been very anti-climactic.
But for those of you who have always made use of your slow cooker or recently purchased a new one, I bet you could totally relate.
Using a slow cooker is sort of like having a cleaning lady. Sure you have to tidy up before she comes over but once you get home from work, the heavy work is done and you can relax and enjoy.
Ok, realistically you still have to do all the prep and cleaning when using a slow cooker so maybe it is more like childbirth...you tend to forget about all the hard work and only remember the joy of having dinner ready and waiting when you get home. Which prompts you to use it again and again.
In my house, the slow cooker has three common uses:
- One-pot meals made in the morning before we leave the house. Sometimes I will prepare the veggies and meat the night before and store them in airtight containers so that I can dump them into the slow cooker in the morning.
- Veggie side dishes, made in the morning before we leave the house, that will accompany some simple grilled meat made when we get home.
- One-pot meals that are made in batches during a Slow Cooker Food Prep Day. This is my favorite use by far. Read on to see how this works.
Let me start first with why you want to learn about the Slow Cooker Food Prep Day.
Picture this. It is a cold, drizzly afternoon. You have felt tired all day and cannot wait to get home, light up the fireplace and curl up on the couch under your favorite blanket.
The only thing standing between you and this moment is deciding what to have for dinner, stopping at the grocery store to buy the ingredients, getting home, preparing and cooking, eating and then cleaning up.
You have already forgotten the vision about the fire and the couch, right?
Now, picture this instead. It is the a cold drizzly day and you feel an extra big sense of excitement because you know, as this workday is coming to an end, that your meal is going to be ready and warm, waiting in your slow cooker whenever you and the kids decide to sit down and eat.
On top of that, you did not have to rush around this morning to prepare the food and you do not have to clean up any mess because this meal was prepared, packaged and cleaned up last week, and was waiting in the freezer ready to pop right into the slow cooker this morning.
Ahhhh…it feels good to be that prepared, to save time, to save money and to have a more relaxed and enjoyable mealtime with your family. And it is actually easy with some practice.
So here is how it rolls.
Choose 5 recipes that you can make in your slow cooker and print them.
Choose recipes that have some similar ingredients such as onions, sweet potatoes and canned tomatoes. This way, you can save some money by buying them in bulk.
With that being said, make sure you have some variety so that you are still excited about your meals.
Get your recipes in front of you and tally up the ingredients on your computer or a piece of paper. List them as ten chicken breasts, two pounds of chicken thighs, four pounds of sausages, and four sweet potatoes….
Double everything!
This way you can make ten meals instead of five in one food prep day.
As an aside, before you double everything, look and see how many servings the recipe will yield and decide what quantity will feed your family twice.
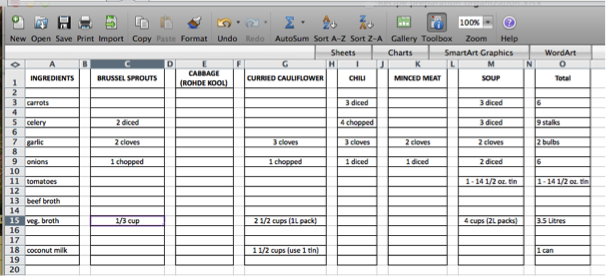
At this point, my friend Isabel even creates a spreadsheet. She lists all of the ingredients down the left side. Across the top she has a column for each ingredient and their quantity. For example, carrots (10), 4 chopped, 6 diced. Then, down the right side, she totals up all of the ingredients.
Here is a copy of Isabel's spreadsheet:
Add labels and large Ziploc bags to your list.
If you use the spreadsheet method you can just copy the ‘ingredient’ and ‘total’ column side by side onto a new page and print.
This becomes your grocery list.
Save and take good care of this list. If you are happy with the recipes you can simply reuse this plan over and over without having to think through this technical stuff again.
Now the fun part...shop!
Shopping in bulk or purchasing a Costco membership may serve you well. Checking flyers for specials may also be handy if the sale makes the extra drive worthwhile.
You can still prosper by buying a bunch of extra meat during a good sale if you prepare it for your recipe by cutting it up before freezing it. When the food prep day comes that you are ready to use it just add the veggies for your recipe into the bag, on top of the frozen meat.
Slightly obvious note...do not thaw frozen meat and then refreeze it.
Next, prepare...get to work!
Now it is time to get to work. I recommend doing this the day after you shop so you are energized and ready to conquer this moderately large task.
First, lie out a copy of each recipe and gather its related ingredients. If you are using the spreadsheet method you will not need the recipes and you can just group the ingredients together.
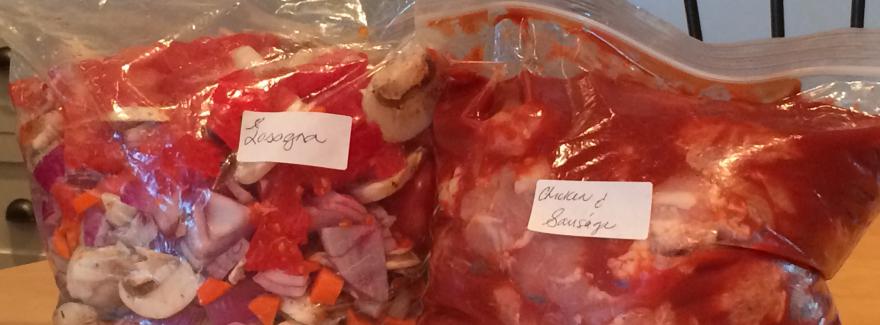
Create the labels for the Ziploc bags with the recipe title and any additional cooking instructions you may need. I like to follow a standard instruction of ten hours on low from frozen, so I do not need to write anything extra. If however, I am missing a green pepper or need to add fresh cilantro before serving I will add that instruction to the label.
Affix the labels to the bags and lay out a couple of cutting boards, hand towels, a sharp butcher knife, many bowls and enough large Ziploc bags to accommodate your recipes. In this example you would need ten bags because you are making ten meals.
Now you can turn on your favorite tunes, podcast or audio book so long as you can concentrate on two things at once.
It is now time to look at your spreadsheet. If you need six carrots total for two recipes and all of them are diced then peel and dice up the carrots and put them into a bowl. Do the same, using a new bowl for each of the other ingredients. If four of your sweet potatoes are chopped and two are diced, then put these into separate bowls.
Next, cut up the meat. Cut all the chicken at once then wash the cutting board before cutting up another type of meat. Put the meat directly into the appropriate Ziploc bag.
Now put the veggies into the bags. It is okay to guesstimate how much of each vegetable goes into each bag. A handful in this one, two handfuls in that one…
Next, open all the cans and pour the canned ingredients into the bags and add herbs or spices.
Close the bag after releasing as much air as possible and put the bags in your freezer.
That is it. Time to clean up.
You now have ten nights worth of cooking complete. These meals also make great gifts when someone you know needs a hand due to a family event or illness….if you are willing to part with a meal!
Here are your defrosting and cooking instructions.
What I have found to work best is to take the bag out of the freezer the night before and place it in a bowl on the counter or in the fridge if you prefer. That way it is defrosted just enough to slide easily out of the bag and into the slow cooker in the morning.
I recommend putting the frozen bag in a bowl as a precautionary measure in the event that there is ever a hole in the bag.
When you wake up, empty the contents into the slow cooker and cook on low for 8-10 hours. If the meal is completely defrosted you can generally cook it on low for 6-8 hours.
One additional tip...having some homemade broth around on your food prep day is extremely helpful. Slow cooker recipes often require a cup or two of broth and homemade broth is very nutrient dense versus the packaged stuff.
If you have frozen some broth into one or two cup portions you can just run the container under hot water until the broth slides out easily. Then put the frozen chunk of broth into the labeled bag with all the other ingredients.
Whether you do slow cooker food prep every week and never use your oven again or do it once a month so that you are prepared for that one night a week that you or your kids have an activity scheduled, this strategy really has an incredible impact on your time and hopefully your budget.
I hope that this blog has given you all the support you need to try this out in your own kitchen.
For simple By Design recipes why not pick up your copy of the Eat By Design Cookbook. I’ve created it in the form of a 28-day meal plan (plus grocery lists!) so you don’t need to think about what’s for breakfast, lunch or dinner for the next month. Or you can grab the first 7 days FREE by clicking here..